🚀 Elevate Your Storage Game!
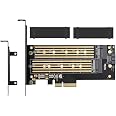
The Dual M.2 PCIe Adapter by MHQJRH allows you to connect two M.2 SSDs (one SATA and one NVMe) to your system, enhancing your storage capabilities. With advanced heat sink technology and support for multiple M.2 sizes, this adapter is designed for high performance and easy installation across various operating systems.
| Brand | MHQJRH |
| Operating System | Linux, Windows, Mac OS |
| Item Weight | 5.3 ounces |
| Product Dimensions | 7.3 x 4.2 x 1 inches |
| Item Dimensions LxWxH | 7.3 x 4.2 x 1 inches |
| Color | YT-805 |
| Manufacturer | YATENG |
| ASIN | B07JKH5VTL |
| Is Discontinued By Manufacturer | No |
| Date First Available | October 19, 2018 |
J**S
Works Great! - But Needs More Explicit Instructions - Read Mine
I used the Yateng board to install a Samsung 970 EVO PLUS 1 Tb M.2 vNand SSD in a Gen 3 x4 PCIE slot. The result is that even though the Yateng board is sharing the PCIE bus with an nVidia GTX 1070 Super x16 graphics board, the Samsung 970 EVO PLUS performs close to its maximum specs and is faster than my 512 Gb KIOXIA (Toshiba spinoff) System drive on a Windows 10 Pro vers. 2004 computer.The instructions as far as mounting the heat radiator on the NVME drive board are clear enough BUT at least as first installed, the silica gel does not make contact between the back of the radiator board and the front surface of the Samsung SSD board-because the Samsung board is NOT flat! One can see air gaps between the radiator, the gel pad, and the Samsung board - so much for heat radiation - however when all was assembled and put into the computer, the Samsung Magician software says the board is operating at a normal temperature, 102 to 109 deg F in a house that's 82 to 86 deg F itself. Perhaps with time the gel pad supposed to absorb water from the air and swell to make contact????The next challenge was how to screw the left end of the Samsung SSD board to the Yateng PCIE board (see 1st attached photo). There's a packet of 4 screws in the Yateng box but no instructions. The bracket in the Yateng on the right to plug in the SSD NVME connectors elevates the SSD drive off the Yateng PCIE board. So you don't want to screw the SSD board flat down on the left or you might strain or break the NVME receptacle on the right or stress out the SSD drive itself. Looking around the Yateng board, there are TWO knurled knobs screwed onto the board with screws that come through the other side of the board (lower left of photo). It turns out that if you unscrew a knob, use its indented edge to prop up the left end of the SSD board, then insert and tighten the screw from the other side of the board, the SSD board is very nicely mounted and supported over the Yateng board, same height on both ends, parallel to Yateng board. The 2nd screw/knob combination in the lower left of the Yateng board I left in place. That's presumably for anyone who wants to mount a 2nd NVME SSD board in the upper slot and use it as a (much slower) SATA SSD drive with the supplied SATA cable, etc.Last problem with no instructions supplied was how to attach the mounting bracket to the Yateng board (if you open your computer and look at the space the board is going to go into, you'll know from the size of the filler bracket already there whether you need to use the large or small mounting bracket supplied with the Yateng board). I need to use the larger mounting bracket as I have a big computer case. If you look carefully at the 2nd photo I've attached, you can see that the mounting bracket attachment points GO BEHIND THE YATENG BOARD, not on the same side that the SSD is mounted. So if you put the mounting bracket behind the board, the two smaller screws supplied in a bag work nicely to clamp the Yateng board between the screw heads and the mounting bracket attachment points.Once I had inserted the board, closed the case, reattached all the wires, powered my computer up, I went to the Windows 10 disk management utility and allocated the drive as a GPT partition table and formatted the drive with NTFS as a simple volume. I then downloaded Samsung Magician and ran some performance tests. Ideally, the Samsung drive should be able to do 3,500/3,300 MB/s read/write performance. The performance I got in the PCIE slot was not quite there (see 3rd attached photo) but close enough for me (I was actually moving the mouse from time to prevent the screen from timing out and I did not shut down any normally running system processes, either and also as I mentioned, I have a HUGE graphics card using the PCIE bus, too). The performance is better the 512 Gb KIOXA system drive inserted directly into an NVME slot on the motherboard, especially 3x better for random reads and writes (see 4th photo).For anyone using Windows who wants to know why to make a choice for GPT partitioning vs. the more classic MBR, I found a nice article entitled "MBR vs. GPT: Which Should You Use for Your SSD?" on the makeuseof . com website. You can probably easily find it by a Search. There are some reasons for choosing MBR but GPT is usually the better choice.
R**L
Reasonably easy to install once you figure out how. Could have used better intructions.
Had to look up how to install this as the instructions weren't clear on the most important points, especially with respect to the support studs. For certain M.2 NVMe and SATA drive lengths I discovered that you had to remove the installed support stud from the card and remove the replacement stud from the card (as they too are installed on the card) as well. Also, the drive doesn't sit on top of the support stud as most do, they fit in a slot on the stud and so you have to slide the card into the stud slot, then attach the stud to the board from underneath; very unhandy. I like the way the card fits snugly into the PCIe slot. Another thing that I don't care for is that the heat sinks' adhesive is poor as they fell off the drives after about a month. I do like the fast data rate speed for both writing to and reading from the drives. The card didn't require the addition of new drivers either; it was truly plug and play.UPDATEI have used this card with an NVMe M.2 and a SATA M.2 installed on it and it makes backing up my data very easy; I no longer need to unplug any cables and, therefore, don't need to remove the case cover. I just take the primary drives that I use that are installed onto/connected to the mobo offline after backing up to the drives installed on the card and modify the UEFI to boot from the boot backup drive to verify that the backups were successful. Then I put the primary drives back online and take the backup drives(drives installed on the card) offline and reconfigure the UEFI to boot from the primary boot drive and I'm ready to go again.
L**D
Great. Why would I use it though?
1. No m.2 slot on your motherboard2. Want to keep your all SATA ports intact3. AestheticsThis thing is great for what it does. I have m.2 slots on my z390 MSI Gaming Edge AC motherboard, but I did not want to plug m.2 nvme to the port near i9 9900k, and next to GPU. If I was to use the m.2 slot below my gpu I would lose 2 SATA ports. So this is where this thing comes in clean.You can plug the pcie card into a bottom slot or slot below your graphics card. Just make sure you are not using parallel GPU ports or your graphics card will drop down to 8x, instead of it's max 16x value, this will make you lose FPS in games by about 5% to 10%.Also do not plug this card into pcie slot above your graphics card, or you will once again reduce your GPU power to x8.In my set up I have GPU in PCIE 3.0 x16 slot, firewire card for my sound interface in PCIE 3.0 x1 slot, and m.2 adapter card (this) in PCIE 3.0 x4 slot.This will still allow my NVME to fully work at 100% capacity, and I am not losing x16 functionality of my GPU.PCIE 3.0 x4 will still allow up to 3.9 GB per second transfer.PCIE 2.0 x4 will still allow up to 1.6 GB per second transferPCIE 2.0 x2 will still allow up to 800 MB per second transferand regular Sata III up to 600 MB/sSo if you are reviving your old PC with this simple adapter it's well worth it. I have a relatively inexpensive M.2 NVME that can do 740 MB/s, and it's more than enough for me. Samsung Evo 860 Sata III is about 550 MB/s, and I have 3.If you are going for fastest m.2s, then go for Samsung Evo 870/860/850.Just keep in mind what PCIE lane you are using, and what gen it is (3.0 or 2.0)Plugging sata m.2s into nvme slot will result in no detection of you m.2. It will go in top slot and needs sata connection into open sata port. But you are limited to 600 mb/s max speed. M.2 sata is b-key, nvme goes in bottom slot of the adapter.No speed is reduced in comparison of real nvme slot on your motherboard. I ran Crystal Mark to confirmLeds are very bright, so I took a screwdriver and popped them out. They are about 10% length of a match, and about half as thick.Solution for those that don't like the red light blinking.Also adatpter comes with nice heatsinks.I am satisfied with this adapter for what it is.If you need B-Key/M-key adapter with no wire required, look on ebay for it. I found one for about $30. It has a converter that this card does not have, hence the sata cable.Like I said, nvme does not require one though.
Trustpilot
2 weeks ago
1 day ago